Exploring the Advantages and Challenges of Finger Joints
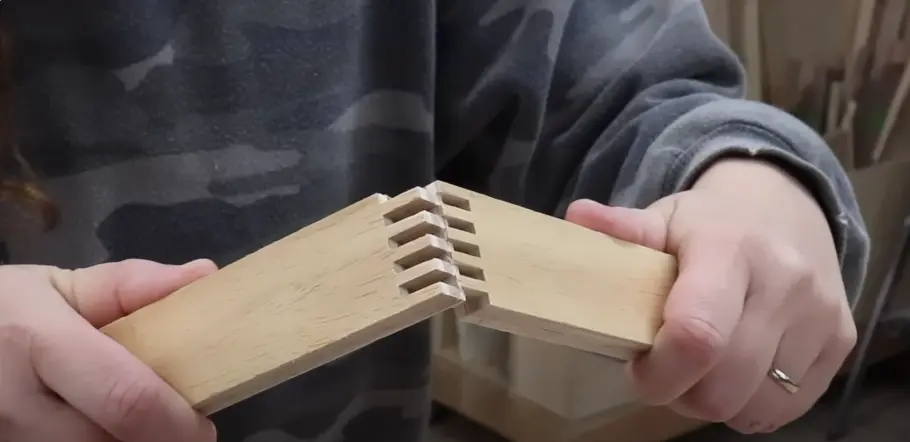
A finger joint, also known as a comb joint, is a woodworking joint made by cutting a set of complementary, interlocking profiles in two pieces of wood, which are then glued. The cross-section of the joint resembles the interlocking of fingers between two hands, hence the name finger joint. The sides of each profile increase the surface area for gluing, resulting in a strong bond, stronger than a butt joint but not very visually appealing. Finger joints are regularly confused with box joints, which are used for corners of boxes or box-like constructions. Finger joints are generally created by using identical profiles for both pieces, made complementary by rotation or translation of the tool with respect to the workpiece. A finger router bit is typically used, but spindle moulders can also be used. Manual cutting of finger joints is time-consuming and error-prone, hence rarely done except in craft pieces.
How To Make Finger Joints?
- Choose the right saw blade. You want to use a ripping blade or one with flat top (FT) teeth, not an alternate top bevel (ATB) blade, as the latter will not produce a flat top on the joint.
- Measure the width of your saw blade’s kerf (the width of the cut) and use that to make a “pin” the same width for your jig.
- Construct a simple jig with a piece of plywood and the pin you made. Position the pin the same distance from the blade as the kerf width for a tight fit.
- Make test cuts on scrap to dial in the fit of the joint, adjusting the position of the jig as needed.
- With the jig set up, you can efficiently cut the finger joints by placing one edge against the pin, making a cut, then moving the workpiece over and repeating.
- Apply glue between the interlocking fingers and clamp the joint together.
The key is getting the jig setup precisely so the finger joints fit together tightly. With some practice, you can make strong, attractive finger joints for boxes and other woodworking projects.
Uses Of Finger joint
Finger joints are commonly used in woodworking for various applications like baseboards, moulding or trim, and can be used in floor boards, and door construction. They can also be used decoratively, such as with contrasting colours of wood to create a striking pattern. However, finger joints can be difficult to sand or plane, and may not be suitable for projects that require a seamless, uniform appearance or for every type of wood due to the risk of splitting or cracking.
Advantages
There are several advantages to using finger joints in woodworking:
- Durability and cost-effectiveness: Finger jointed wood panels are an excellent option for people who want to install wood panelling in their homes. They are easy to install and can be done by any homeowner with some basic knowledge of how to work with tools. The joints provide a strong bond, making them durable for a vertical load, and adhesives can be applied to create a stronger joint than mortise and tenon.
- Makes a straighter joint: Finger joints help to create a straighter joint, reducing the likelihood of warping or bowing.
- Less wood gets wasted during manufacturing: Finger joints allow for the use of shorter sections of wood, reducing waste and making it possible to use less expensive or reclaimed wood.
- Cost-effective: Finger jointing allows for the use of shorter wood sections, which can be less expensive than longer sections. This can be advantageous for large-scale projects without compromising on quality.
- Environmental impact: Finger jointed boards often contribute to sustainable practices by maximizing the use of wood resources. They can be made from offcuts and small pieces that might otherwise go to waste.
- Dimensional stability: The interlocking finger joints distribute weight and stress evenly across the board, leading to improved dimensional stability. This makes finger jointed boards less prone to expansion and contraction due to changes in humidity and temperature.
Disadvantages
Finger joints in woodworking have some disadvantages, including:
- Not visually appealing: Finger joints are not as aesthetically pleasing as other types of joints, such as mortise and tenon joints, due to the visible interlocking fingers.
- Crooked joints: Finger joints can come out crooked, making it difficult to create a smooth wall or surface.
- Harder to achieve a smooth wall: The interlocking fingers in finger joints can make it harder to achieve a smooth wall, especially if the joint is not perfectly aligned or the wood is not perfectly flat.
- Susceptible to moisture: Finger joints can be susceptible to moisture, which can cause the wood to expand and contract, leading to potential weakening or failure of the joint.
- Performance issues: Finger joint lumber can perform poorly in certain applications, especially when exposed to environmental conditions such as heat, cold, and moisture, as the pieces of wood can expand and contract at different rates, leading to the joint weakening and pushing apart over time.
- Not suitable for structural applications: Finger joint lumber should not be used for any structural or exposed to the elements applications, as it is not as strong as solid wood and can fail under stress or adverse conditions.
Overall, while finger joints can be a useful and cost-effective woodworking technique, they do have some disadvantages that should be considered before using them in a project.